Showing posts with label 16th century. Show all posts

Sunday, November 23, 2014

Cuffs Finished!

...Though they are still not quite usable.  I still have to plan out and execute the smock, including some further blackwork (in white!) for the neckline.  But the cuffs themselves are all finished and only need to be gathered, trimmed, and sewn to their final resting place.

The first step after the embroidery proper was finished was putting the smallest possible rolled hem around the edges. For this I used 100/3 Londonderry linen thread waxed with some beeswax.

Then came the needle lace -- though it's a pretty generous term for what is basically a variant on a blanket stitch.  This has the double benefit of giving a nice finished edge to the cuffs (and the neckline, when that gets finished) as well as giving some strength to the linen edge, since it's basically tied in double knots every eight threads.


And here's the finished cuffs after a quick hot water wash and some pressing.  From here they'll be mounted on a mat board for competition and display until they are ready to actually become clothing.


Part of me is still just glad and sort of amazed that I actually managed to finish them.

Tuesday, November 4, 2014

Jane Seymore Cuffs: Embroidery Done!

In less than a year, too!  My speed seems to be improving!


That's 36 total inches, accomplished during the few bits of motivated spare time I've had since mid-January.  Next on the docket is to trim off all the extra linen, give it the tiniest possible rolled hem I can muster, and do some simple needlelace on the ends.


My previous screwup with the design ended up being perfect for learning and practicing a stitch that would work for the edges. I got the basic needlelace stitch (itself a variation of a blanket stitch) from this tutorial but added my own extra step to give it the bumpiness that exists in Holbein's painting.  It's maybe not quite exactly the same, but it seems really close and plausible.

The neckline embroidery may very well end up going much faster since the design is pretty basic, but it's something I'll have to chart out myself and execute in white...so maybe sixes after all is said and done.

Wednesday, November 23, 2011

ACC: Sleeves

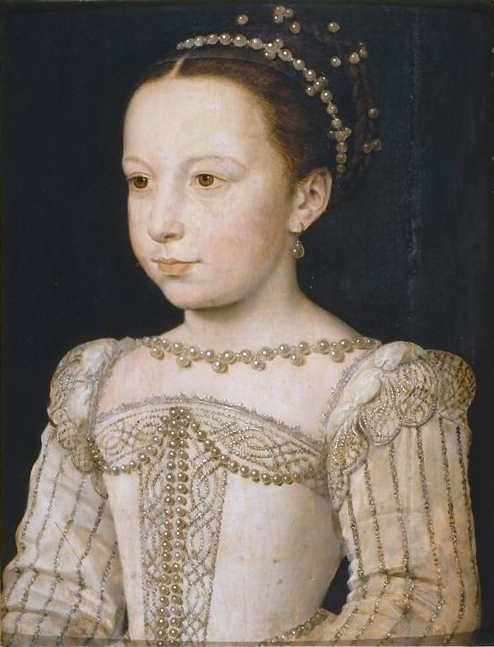
The wheels of progress move slowly, but they do move.  This, as you may recall, is what I was going for:
Margot de Valois, 1560 (from Wikipedia)
I decided on DMC memory thread for the decorative elements on the sleeves and front.  It's a fine cotton/viscose thread wrapped around a cotton and copper wire core.  It's also fairly cheap, readily available, and, conceptually speaking, fairly period to at least the 17th century (Tricia of Thistle Threads offers a silk thread-wrapped pearl purl as part of her 17th century kits that was way out of my price range, but it gave me the initial idea).  I looked into metallic threads but the cost was pretty severe in the amounts I was looking for; plus, I never really decided whether to commit to gold or silver jewelry, so I could still do either further down the process.

DMC Memory Thread.  The little plastic doohickies are useless


I worked on the sleeves for the last month or so; two weeks of actually embroidering, and several more of being completely unmotivated.  I finished the last knot today:

Couched Sleeves, DMC Memory Thread (white) on silk with silk thread
I love the effect, though it was hard to work with such a large piece of fabric without everything kinking up.

A quick note on the sleeves:  I usually do sleeves with the seam running down the back of the arm instead of the more modern technique of running it from the armpit because it's a more accurate cut for the 16th century.  But trying to figure placement for the vertical lines was making my brain explode, so I went with the symmetrical sleeve pattern for easy ruling.

I'm thinking at this point that I will actually make the bodice of the dress first before trying the more complicated filigree embroidery on it, just to ensure that everything will work out with the fit and construction.  Fortunately for me, I have a nice long weekend to make that happen.

Wednesday, June 22, 2011

LJ Archives: June 2011


June 22:  ACC: Fabrics
 My stash is pretty close to depleted, but I was able to pull all my fashion yardage from what I already have:


While this qualifies as stash, it's my newest purchase.  I got it at a Hancock sale on Saturday ($5/yard!).  It's a linen herringbone twill.  It's wonderfully soft and floaty and will go toward a smock and probably also a partlet.  There is also a japanese kosode in the works which will probably take the remainder of the bolt.


My corset is wearable so I can start fitting the dress but still needs several hours worth of work binding the bottom edges.  There is enough gold silk to make bias tape for those edges, and I'm hopeful that there will also be enough to put some guards on a petticoat.  The linen fabric on the right was originally yellow until I threw it into a blue dyebath, and now it's a great shade of foresty green, which will be really fun with the magenta corset fabric.


I had a picture of the blue on an earlier post, but here's a flash shot to give a little better idea of the color.  The original fabric is a sort of creamy white in a kind of funny mystery weave (not quite taffeta, but not really anything else), but it's 100% silk, takes dye like a champ, and has a really nice crisp finish with a decent lining.  There's enough to have some white silk to make the shoulder puffs, and maybe even to line a few things.  My white kirtle is the undyed version of this fabric, and it was actually quite easy to work with.


For the ropa/overgown I decided to finally use this rayon velvet that was probably my first big fabric splurge (I bought 10 yards right after I graduated college; it was only $4/yard).  It's a beautiful deep mulberry color that shines when it catches the light.  I also have 20 yards of gold metallic bobbin lace (half bright gold, half antique gold) to trim it.  While it might not coordinate perfectly with the dark blue gown, it'll look smashing with some other stuff I have (like my white kirtle).  I foresee this fabric being a nightmare to work with, and much hand-basting in my future.

There are still little bits that I might not be able to pull from stash (canvas, linings, etc) but I'm pretty hopeful that the cost will be minimal.

June 21:  Artemisian Costuming Challenge
So the call has been put out in our area for a challenge similar to the one started by Realm of Venus recently, except it's open to any time period or locale used in the SCA.  Since I had a brilliant idea for a gown anyway, I decided to join in.  The challenge includes making the following between now and the end of the year:

1.  A skin layer:  for this I'll make a square-necked linen smock/chemise, possibly with some embroidery around the neckline, and a green linen petticoat made to coordinate with my corset (hopefully).  I'll also finish my corset to wear along with it, though it might not count for the purposes of the competition. 

2.  The main garment:  This will be a blue silk gown based on the portrait of Margot de Valois with silver (yeah, I decided on the silver) couching.

3.  An outer layer.  I'm much more iffy on this (my whole point with the original gown was that I wouldn't need the extra layer) but if it's doable after everything else is done, I'm  thinking of a loose gown with a high neck, similar to this one worn by Margot's sister Claude:


It's very similar to portrayals of Italian zimarra, so I might take some cues from that angle.  I have no idea what it will be yet, because there's nothing in my stash that would work for it.  Hastings recommended a dark purple fabric lined in pink, which sounds fantastic with a heavy satin and linen, but we'll have to see.

4.  An accessory.  Any number of things can apply to this, but I'm thinking anything from the following:  a zibellino (probably with a lot of help from Holly), a partlet, stockings, tablet woven garters, a feather fan, etc.

There is also a price limit of $100, but stash materials can be used.  I can actually cover quite a bit from my stash, but I'll still need a lot of notions and shiny bits.

June 15th:  New Project 
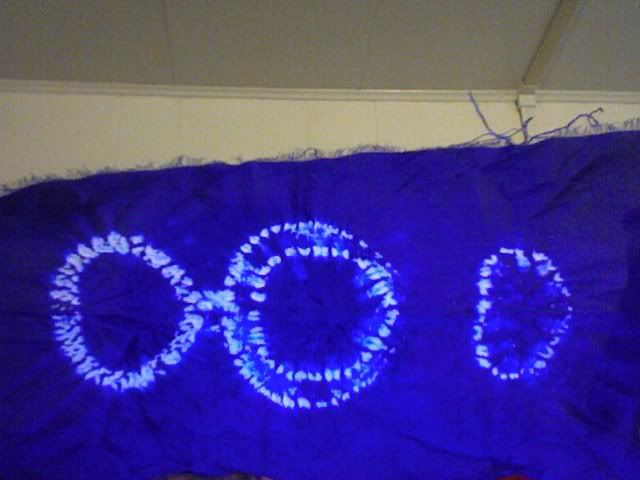
I'd gotten some sapphire blue dye from Dharma in a futile attempt to get some silk embroidery thread that matched my blue 15th century kirtle (It tangled homelessly in the dyebath and I gave up on it when I found a thread that worked).  Drew pulled it out last week to do some shibori experiments, and it is the most brilliant color of blue imaginable.


The photo barely does it justice.  I just stared at the sample scraps longingly before I turned my sights to the entire bolt still left over from both of our projects.  It turns out we still have over 8 yards, which demanded to be turned into a blue gown, so I called dibs.

I thought about doing a new Tudor, but the silk itself has a pretty soft drape, and even with the dye job giving it a crisper, more taffeta-like finish, I wasn't sure it would play well with the big sleeves of a typical tudor gown.  Besides, I already have one of those in the works.

So I went a little later, to the work of Francois Clouet in the 1560s, and I found this portrait of Margot de Valois as a small girl:


And there it was.  The dress that I must now have.   The work involved tailoring-wise is pretty simple compared to my other projects -- there's really only one visible outer layer, and I don't even need a petticoat if I don't feel like having a split skirt in the front (and I'm thinking I don't).  The sleeves are simple other than some classy embellishment and unique shoulder treatments, which are not huge and bulbous like what you see in England, nor are quite as crazy poufy and/or complicated like what you'd find in Italy.

Adult women wore this stuff too:


Claude de Châteaubrun de Beaune dame de Gouffier, by Francois Clouet, c. 1560s  (and yes, there are plans for a zibillino too, now that I can finally succumb to that particular fad)

My big internal conflict now is trying to decide if I want to do the embellishment in gold or silver.  Gold seems to be standard for just about everything in the period, and jewelry-wise it would look really great with the pearls.  Silver is used occasionally (it's certainly on Margot's gown), would be better suited toward my heraldic colors, and would  be really eye catching couched on the blue.  Using both at the same time seems cheesy.  Decisions, decisions.

June 8th:  I did a Thing!
Noelle asked if I could make her some garters for when she becomes a Laurel at Baron's war (big prestigious award in the SCA for historical arts), and gave me free reign over the design, so I decided to do not one but two techniques that were completely new to me:  brocading, and warp twine manipulation.  I'm playing a little fast and loose with specific time periods and places (though all of them are within the medieval period), mostly because I'm using design elements that are especially significant for the recipient.  It's woven with a Kanagawa 1000 denier silk that Noelle purchased and sent my way.

Here are my patterns:


The fleur-de-lis and leaf vine (reminiscent of laurel leaves, yes?) are from Ecclesiastical Pomp and Aristocratic Circumstance, about the 13th and 14th centuries maybe (I don't feel like checking right now).  The vine was originally for 13 cards and was sized up to work with a 25 card band, but the fleur (which is 17 cards wide) was alternated between sides to fill up the space.


The brocading worked fabulously, even with my wonky tension at the beginning.  This portion is for the tails of the garters, which are 5 fleurs long, or maybe 3-4 inches.  It's done with a Kreinik gold braid.

I was so tempted just to do the whole thing in this brocade pattern but it's really slow and the gold braid makes it a little stiff and potentially pokey.


The main body of the garters are the warp-twined laurel leaves.  I can't capture it very well because the effect is very subtle, but the design comes about by turning the relief backwards and the rest forwards.  This technique was in Peter Collingwood's Techniques of Tablet Weaving and is document-able to the 10th century.  It's also pretty slow, but I get a lot of satisfaction of splitting up the pack and turning them in different directions. 


I'm maybe six inches in, and have 36 or so more to go.

Sunday, May 15, 2011

LJ Archives: May 2011

May 15th:  New Project:  Effigy Bodies
I started this corset ages ago, before I really got my butt in gear to finish my blue kirtle.


It's fully boned (though I suspect I'll pull some bones out of the back) with cable ties, and is made with two layers of duck canvas.  There are only a few tabs cut out now, but I will cut out a few more later to keep it from fraying too much.


And here it is with the silk taffeta outer layer pinned in place.  It looks very similar in color to the last picture, but it's actually a really great magenta color.  Since this silk was from a thrifted skirt, I had to split the large front pieces more or less in half. 


I also wasn't super happy with how the front was connecting to the side back seam when sewing it by machine, so I'm handsewing it in place.  I'm not entirely worried about making it look pretty because I'm planning to cover it with a decorative satin stitch that matches the binding.

Which will be this:


Bianca had several large pieces of this gold silk lying around, some with the bias already marked, which was awesome, considering the trouble I had finding any at the fabric store.

Yay progress!


May 15th:  Kirtle Progress:  Tablet-Woven Reinforcement
To do the braid around the neckline and lacing edge of my kirtle, I used a simple setup of 2 cards with an SZ twist, with all blue thread that matched the fashion fabric of the dress.


The cards were turned in a continuous forward motion, which built up a lot of twist in the unused warp threads.  I wanted to have the 'switch' to happen at the halfway point at the CB seam, which involved untying the end and combing out the twist.  After the halfway point the cards were switched to backward turns.


Instead of using a shuttle, I just used a needle threaded with the weft thread (the same 1000 denier silk as the warps).  I used the needle to beat the weft, and then sew it down to the edge in a circular, whipstitch motion.

Note:  This process KILLS the weft thread after about two inches of work.  I had to use very small sewing lengths.  It's also not great for your fingertips and fingernails, which will get pressed on and scratched up.

Also note that in this picture I used the backstrap method to tension it (the warps are tied to a belt around my waist).  I don't recommend it.  After a while you won't be able to reach your shed.  This happened to me, so I set up two fixed points with a doorknob and a table leg.

Also, I about wanted to kill the little hummingbirds on my protege belt, the pointy little devils.


The flash kind of ate this shot, but you can see how it turned out.  You end up with something very much like a herringbone braid that sits not really on either side of the dress, but on the very edge between the layers.

I worked this while the front seam of the skirt was still open, which worked out really well.  Corners were kind of a monster, but I found that if you work a little weaving after you hit the edge but without attaching it, you could work up a little 'slack' and sew it onto the new edge after the corner.  No pictures of it, sorry (it's very hard to convey what I want a picture of to my husband, and taking it myself just isn't going to work).  I'll try to explain it better when I teach it.

The dress is currently hanging up, waiting patiently for gravity to do its thing before I sew the hem.

May 13th:  More Tablet weaving Crazy
It seems that when most people do tablet weaving they use something like this:


It's decent.  The design dates to something like the 1930s and Angie seems to always burn through her tension bar, but it's much more portable than something like this:


These setups are pretty cool, and conceptually it's the only way to do the crazy warp-sewn braids like what I did on my blue dress (for the class I'm going to try to have the cards threaded between two clamps on a table), but even if you make it collapsible, it's not exactly portable in the grab-and-go sort of sense.

But there is a light at the end of the tunnel:


Box looms.

Technically the figure here is doing narrow rigid heddle weaving, but it can also be used to good effect with tablet weaving.  The problem is trying to find one that can go double-duty.  While this one from Spanish Peacock looks awesome, it doesn't look like they're offering it right now, and there are a few other sellers/SCA merchants that look to offer something similar in the 200 dollar range, though they all seem a bit too short to get a good shed.  Alternately, there are directions available to make one from scratch, which is beyond my capabilities (I need another sub-hobby like a hole in my head) but not beyond those of someone really awesome and talented.

Perhaps someone as awesome and talented as my mom. 

Did I mention that my mom is awesome?  And occasionally reads this blog?  And has woodworking tools?  And loves me so much?


May 10th:  KA&S and Tablet Weaving
Kingdom A&S was pretty tiny this year attendance-wise, and since pretty much all of the attendees were either entrants or judges, there wasn't much going on in the afternoon.  The fabric sale fundraiser seemed to work pretty well, but it seemed all of the good stuff disappeared right off the bat, so I didn't get anything.  My blue dress was only lacking a hem, and I need to finish pressing that and do it so I can get some decent pictures, but it got decent scores -- I don't remember the rank it got but it scored somewhere around 35-39 on average (out of 50).  My embroidered coif got masterwork level, which was pretty awesome since I have a lot of "this old thing?" feelings about it at this point (all of the scores were in the 40s). 

Even sans hem, I wore the dress later in the day and got a ton of compliments on it, including one from Elizabeth lamenting that mine was bluer than hers (and next to her she looked navy).  Win!  Everyone was also super impressed with the warp-sewn tablet weaving I did around the neckline -- if we go to Uprising (kind of up in the air right now) I think I'll try to teach a class on it.

I really should get more photos of my completed work.  It's kind of embarrassing.

Tablet weaving is on my mind lately.  A gal on   is working on a fantastic tudor-era gown with tablet-woven trim, and it made me think about how we in the SCA tend to stick tablet weaving on all things Viking and not much else.  And then I stumbled upon this!  And this:


16th century silk brocade with tablet-woven edge
Philadelphia University Design Center (via A Fashionable Excuse)

I mean, I know that tablet weaving was done in the 14th, 15th, and 17th centuries, but I'd never quite made the connection that it was still kicking around in the 16th.  Plus, I got a ton of compliments on the hairtie I wore to KA&S (a very simple pink-and-white striped design in silk thread).  So...there might be more tablet weaving in my future.  Especially since I just ordered this and this for my birthday.  Yay me!

Sunday, December 12, 2010

LJ Archives: December 2010

December 12:  Solstice

Yay for actually finishing a thing on time!  No time for sleeves, but the dress itself is finished.  Now its just a matter of adding another layer, getting some accessories, and sewing on some bling. 


I love how this turned out.  The silk is so light, but with the lining I was able to make the pleats look really sharp.  I got a ton of compliments on it.  I was scared to death to let anything stain it, but I managed with no messes at all, and just a bit of grime on part of the hem from all of my walking around.

Here's the back:


Ånd here's my new farthingale!  I held up beautifully all day, though the tape on the topmost cord undid itself by the end of the evening.  I just need to sew the ends together properly.  90" is probably the perfect size for me -- it gave just the right amount of poof and didn't inhibit my movement at all.  Win!


Drew didn't look so bad himself, either.  He made extra pieces for his court outfit (the hat, red hitoe and purple hakima) in about two days.  He considered himself the best dressed Japanese persona there, and I have to agree. 


He was almost kinda sad that everyone noticed the hat (that took 20 minutes to make and starch) more than his enormous pants (which took the better part of two days).

January 8:  How Cool is This?


by "Master A.W", Portrait of a lady, c. 1536. 
(I thought I'd found it on Wikipedia, but turns out it was from Kimiko Small's website)

I'm a total sucker for black and pink.

But not right now, with my latest project nearing completion.  Focus!

December 16:  Project Update

I spent a long weekend with my family out in New Hampshire for my little niece's baptism, and it was a great mini vacation.  I was hoping to hit the ground running to complete my Solstice project, but after waking up at 4:30 am EST to catch my flights back, I was pretty much useless for the day.

I made a new farthingale, though admittedly I wasn't really intending it to be as such.  I just got three free yards of dupioni silk and decided to make a 10-gore petticoat as something of a practice piece for my A&S kirtle.  The gore technique is fabulous -- by just cutting 10 trapezoids out of every bit of the fabric, I ended up with a beautiful full skirt with a fantastic drape.  Since I went along the width, it was super long, so I decided to gather it up into 5 2" channels for an Arnold-style farthingale, and I boned it with some upholstery cord from Home Fabrics.  It has some issues but I'm pretty pleased with it.  It's a smaller circumfrence than my first farthingale -- 90 inches around the bottom instead of 120, which I think will be an improvement.  I might go even smaller in the future but I want to see how this one goes first.

I'm also making a new kirtle, out of a white stash silk.  Looking through the little scraps of gold silk I had left to try to extend my hem, I decided it was a worthless cause and I made some quick cash selling the gold kirtle to my friend Anna (who is now the lucky recipient of TWO kirtles that I made but can't wear, *grumble*).  But I took my time over Thanksgiving break making the bodice for this next one, and I'm pretty pleased with how it turned out.  I had a successful mockup with two layers of canvas with just a bit of hemp cord to reinforce the lacings, so I'm playing with this concept for a bit -- it seems to fit better with the sillhouette of the 1530s-40s (especially with all of the layers expected of a court outfit), but I have to see how it wears on my body for more than a few minutes at a time.  I plan to cut and pleat the skirt hopefully today (Pics to come up then, hopefully) and do some fun sleeves. 

It's time to consider the jeweled bits on the neckline.  I was trying to find some gemstone-type cabs at Hobby Lobby or Joanns, and came up empty-handed.  The closest I could find were some acrylic flat-backed gems, but they were only in packs of multiple colors and sizes and it didn't seem to be enough of the right size or color for what I want (which is admittedly pretty nebulous).  Currently I have some pretty metal jewelry links that will hopefully get painted to a nice gold color (I found some Testors spray paint that should hopefully turn out well) and some pearls, but it seems a tad plain -- I need something colorful and maybe a bit glittery.  Stuff from Firemountain seems to come so close, yet miss the mark:  Something like this could be nice, but 6 mm seems really small.  Alternately, this could work, but I'd have to glue it on, which might backfire on me.  This would be awesome, but way too expensive to actually get enough to glam up an entire neckline.  Maybe I should check the thrift shops once more.

The kirtle is my only solid goal for Solstice, and while I can probably wear it with my black velvet overgown I don't know if I will (it has some issues).  I thought I could manage a brand new overgown too, but that will have to wait until 12th Night.