Saturday, November 26, 2011

Productive Weekend? Maybe

I had plans to really bang out my bodice this weekend, but here's how it went down:

Wednesday:  Get off work early, help my friend who's hosting thanksgiving make pies, and set up the turkey brine.  Dream about tasty pies.

Thursday:  Cut out bodice front.  Feel like a boss.  Make trifle and creamed corn and use oven for casseroles and bacon. Feel stuffy in the evening, which is not a good sign.

BTW, here's the bodice all cut out, two layers of cotton canvas, and one of cotton batting:

Friday:  Wake up stuffed and congested.  Sit at sewing machine to quilt together bodice layers, only to have the machine not working.  Remember the morning of Collegium, when in a pre-event rush the broken-spring foot pedal was left to run the machine on full power for twenty minutes.  Curse.  Take offending pedal to Bernina shop, where they miraculously had an identical spring to replace the broken one.  Sit at sewing machine a second time, only to find that the fixed-spring pedal is still broken.  Electrics are probably fried, which is a much worse situation than a broken spring.  Curse.  Determine to hell with it, the bodice is getting quilted tonight, and look up pad stitching.  Nurse an entire roll of toilet paper throughout the day, play a bit of Mario Kart with friend's family.  Try not to spread too many germs.  Finally get Mucinex at 10:00 pm so sleep can be possible.

Saturday:  Finish quilting bodice.  Feel like a handsewing boss.


Take machine back to bernina shop, pay $25 for a new universal presser foot retrofitted with the original wiring of the sewing machine.  Express love and devotion to the awesome professionals at the bernina shop.  Go to Zupa's for soup.  Go home intending to work on bodice, but sleep for four hours instead.

Wednesday, November 23, 2011

ACC: Sleeves

The wheels of progress move slowly, but they do move.  This, as you may recall, is what I was going for:
Margot de Valois, 1560 (from Wikipedia)
I decided on DMC memory thread for the decorative elements on the sleeves and front.  It's a fine cotton/viscose thread wrapped around a cotton and copper wire core.  It's also fairly cheap, readily available, and, conceptually speaking, fairly period to at least the 17th century (Tricia of Thistle Threads offers a silk thread-wrapped pearl purl as part of her 17th century kits that was way out of my price range, but it gave me the initial idea).  I looked into metallic threads but the cost was pretty severe in the amounts I was looking for; plus, I never really decided whether to commit to gold or silver jewelry, so I could still do either further down the process.

DMC Memory Thread.  The little plastic doohickies are useless


I worked on the sleeves for the last month or so; two weeks of actually embroidering, and several more of being completely unmotivated.  I finished the last knot today:

Couched Sleeves, DMC Memory Thread (white) on silk with silk thread
I love the effect, though it was hard to work with such a large piece of fabric without everything kinking up.

A quick note on the sleeves:  I usually do sleeves with the seam running down the back of the arm instead of the more modern technique of running it from the armpit because it's a more accurate cut for the 16th century.  But trying to figure placement for the vertical lines was making my brain explode, so I went with the symmetrical sleeve pattern for easy ruling.

I'm thinking at this point that I will actually make the bodice of the dress first before trying the more complicated filigree embroidery on it, just to ensure that everything will work out with the fit and construction.  Fortunately for me, I have a nice long weekend to make that happen.

Friday, October 14, 2011

Tablet Weaving Angst

You may recall my original pattern for a brocaded pair of garters, using a weaving diagram from Il Burato:

I did a small repeat of the pattern in the silk months ago and haven't touched it since because the pattern, to my mind, wasn't working the way that I wanted it to.  Most of the lines were too narrow, the blue tails didn't read well, and the flowers were overly complicated and frail.  Brocading really seems to work best with strong diagonal lines of 2 threads or greater, which meant that the backs of the birds were reading very well (I loved how that part was turning out) but the rest was just kind of blah.

So, after looking at it in my apartment for months, I'm finally trying to come up with solutions.  The benefits of brocading are in its flexibility.  I can start over at any point with a completely new design if i so chose.  I started by strengthening some of the lines on the magpie and making the whole outline black instead of black and blue.

Then, I played around with the idea of taking out the 3-flower motif completely, as it had the thinnest lines and had more complication than I was really willing to put the effort into as a result.  The resulting bird-small flower-bird was too bottom heavy to use on its own, so I tried a bit of inverted tiling:


I thought I'd love this, but I merely like it.  It has nice strong diagonals, but I found I missed the larger flower motif.  So I tried to fill out the design a little more, while not making it quite as compact since that was making the weaving process with two colors difficult.  The results:


I think this might work.  There is a lot more white space (re: space I don't have to weave) which makes it a little simpler while still maintaining most of the integrity of the original design  Several of the lines are thicker to keep it from being so frail.  I won't really know until I start weaving it, but I'm hoping this will be a winner.

I'm also considering playing around with having a thicker line of brocading thread by waxing and doubling up the black and blue strands so they'd act a little more like a ribbon and better fill the space.  I'm searching for my motivation to do so, but it'll come.  Hopefully.

Wednesday, October 5, 2011

Petticoat Bits

Since I was working on a few updates anyway for the ACC, I'll go ahead and explain some of my documentation for the petticoat, as well as a few detail shots that I took today.

In my prowl looking for extant garments, I was elated when I found this beautiful painted cotton petticoat in my search of "1500-1600" in the V&A collections, but I'm convinced that 1570 as the starting year is incorrect or possibly even transposed (as in, it should read 1750).  The East India Company stamp indicates 17th century at the absolute earliest, and the design bears something of an 18th century aesthetic.  Nevertheless, Laura Mellin's instructions on making a 16th century petticoat produced a remarkably similar garment, so I'm willing to think that the basic nature of this item (hopefully) indicates some common lines of construction through time.  It's made in four panels and totals 4x my waist measurement along the width.

My cartridge pleating has no gathering stitches -- don't ask me why, but I was just too paranoid about lining them up well to even try that technique.  Instead, I marked a small hash mark every inch on the skirt and every 1/4 inch on the waistband, and used that as a guide as I whipstitched it together.

The seams and hem were all done by machine, with the gold silk guard covering up the line of stitching at the hem.  I was paranoid about having an overly wobbly line on the guard, so I pulled a thread in the fabric of the skirt for the top edge.  It was kind of a nightmare to follow, but it did end up nice and straight as a result.

Monday, October 3, 2011

ACC: Petticoat Bodies

Just to show that I can in fact take a hint, I finally got motivated to wear my new petticoat bodies to fighter practice and take a few mug shots next to the gym.

Now for me to nitpick everything wrong with it:

The petticoat ended too big around the waist so it's sagging a bit, but it only needs a a few extra eyelets to pick up the slack.  Doing all of the eyelets to match the ones on the tabs is looking mighty tempting, just for the potential for cute little bows all around the waist.


 Also, because of the eleventh hour necessity to split it up the back, the bottom of the backmost tabs are taking way too much strain and so can't lace well.  It's kind of my own fault for having such a dramatic bit of shaping at the side back seam, but it doesn't effect the overall look too much.

Those issues aside, I am tickled to death with how it turned out.  It is exactly what I envisioned when I put the two fabrics together.  I wore it for the better part of the afternoon and there were not any screaming comfort issues.

Also, at two years after I'd finished my lovely embroidered coif, I finally have an excuse to wear it.

 As much as I love the attack laurel coif patterns, I have to admit that they are really big on me.  My hair's long but fine, so my only hope for tying it on was to do two braids over the top of my head to give the cord something to pull against.  It worked pretty well while the knot in the cord held, but it was too slippery (it's my silk tablet woven hairtie) to stay in long-term, and after a few attempts and the pictures I just stopped bothering with it.

Thursday, September 29, 2011

Closing in

I haven't written in a while, but I've been the busy little seamstress.  It's just been slow going due to a lot of hand work lately.  I am very, *very* close on my petticoat bodies.  I was having a crisis for a while because I wanted to use the gold silk from the corset binding for a guard around the bottom, but was mightily paranoid about having enough.  The gold silk came to me courtesy of Mistress Bianca, and largely consisted of one or two large pieces (that I hacked into greedily for the corset binding) and several much smaller bias-cut triangles.  I ended up sewing all of the triangles together into a super bias trapezoid in an effort to eke as much length from it as possible, and I managed to get all I needed with some to spare.  The corset still needs a small amount of binding around the inside of the armhole, but I'm waiting on it until I can really test out the wear to see if there needs to be any adjustment first.  The petticoat just needs a few eyelets to fasten in the front to be functional, and I'm suddenly on the fence on whether or not I want to do eyelets all the way around the waist to correspond with those on the corset tabs.  It might just be more trouble than its worth.

I do love it though.  The gold silk looks fantastic against the green linen, and the skirt itself is very full (4x my waist measurement).  I can easily rock out the sort of wenchy bodice look in my corset-and-petticoat, and I'm very eager (after the challenge) to make an elizabethan-style jacket out of some lovely green shetland wool I got a while ago to make it respectably middle class.

With all of the effort into my underwear and with less than 100 days until the end of the challenge, I'm seriously considering calling my petticoat bodies my "intermediate" layer and foregoing the loose gown.  That way I can devote my time and attention to the blue silk gown and all of the necessary frippery without having another garment hanging over me.

Here's to pictures as soon as I finish the last bits and find my camera!

Monday, August 22, 2011

I survived hand binding!

I think the fifth sewing circle of hell is hand-binding corset tabs into eternity.


I'm pretty ashamed of the inconsistent job I did on this binding, but I grit my teeth and did it and now it's done and other than a very small amount of adjustment I'm just going to have to live with it.

I do have to give my friend Karena some mad props for saving my sanity on this.  While I was at fighter practice bitching about sewing down this stupidly frustrating binding, she offered to take it on in exchange for some consultation and drafting work on her own Elizabethan outfit.  In my weakness (I think I said something about oh please take it away just make the pain stop) I took her up on it.  She ended up getting waylaid by her own sewing deadline for a wedding, so i ended up doing most of it anyway, but it was enough that i could rediscover my motivation and push through it.  THANK YOU!  It still needs 9 sets of eyelets around the waist, a bit of boning adjustment, and binding around the armscye.  I'm waiting on that until last because I might need to make adjustments to the armscye for comfort, and I've found the best way to figure that out is to wear it for reals once or twice.

If you've been following this you might have seen that my original pattern was for a one-piece corset with lacing only up the front in similitude of the effigy bodies, but the boning made it shrink to the point where it was *really* overly busty in the front.  The back was split and eyelets added (criss-cross style instead of spiral, because I know from experience the limitations of my dresser/husband) and the effect was perfect once I gave the girls a little more room.

I also looked closely at the gold silk bits that made up the original binding, and I *think* I'll have enough for two 1" rings of guards around the bottom of the matching petticoat.  I'll be reacquainting myself with my rotary cutter shortly to find out for sure.

Saturday, August 20, 2011

Warped

The problem with doing so much handwork is that there really isn't much to blog about.  I've been working for weeks on the bottom edge binding around my corset, and it's finally done (pics to follow shortly) but today I was feeling particularly inspired so I started setting up the warp for my magpie garters.  And, in my grand tradition of trying things for the first time, I decided to try my hand at circular warping.

As far as supplies are concerned, I found a really great source for silk weaving thread, so I bought two cones thinking it would be more than I ever needed:
To do a continuous warp for tablet weaving, I needed four cones.  so I cut each in half with the help of my fancy pants warping board.

 My husband built it, and it measures and holds an almost infinite amount of thread easily measurable increments (every pass from peg to peg is one yard, and the pegs on top help count each pass).  With the help of this the job of cutting down my cones into four roughly equal parts was very easy.

Why yes those are toilet paper rolls, and yes that is a spoon taped to the wall.  They're hung on the wall with a dowel and threaded through the spoon's 'eye' to assist in the warping process.  Don't ask me why I had to do it in the most white trash way possible, though.


This part was really tricky to try to photograph as it involved all of my hands, but the method of continuous warp makes warping cards incredibly fast, because you thread the entire pack, and then separate out the cards as you warp it up.  Once again, the warping board was invaluable.  I ended up with perfectly strung cards that were pretty much all the same length, saving time and minimizing waste in the warping process. 

Now it came time to pull out my newest favorite thing:


Drew's keen eye found this antique Structo loom at DI and it was love at first sight.  The heddles and reed were easy enough to remove, and could still be re-attached easily:


So I had a simple ratchet setup, identical to my earlier idea pertaining to box looms (scroll down) based on examples from illuminated manuscripts.

So far, the idea seems to have merit:

And I'm very pleased with how much tension the loom provides as well.  I hope to start brocading tomorrow.

Wednesday, August 10, 2011

Update on a new thing: Tablet-woven garters

I got really inspired yesterday and decided more-or-less on a design for a pair of tablet woven garters as part of my challenge project:


-I got this idea from a band in EP&AC* that had birds on it, but I kept thinking that the birds on that band looked terribly dumpy.  And while the patterns in Il Burato weren't meant specifically for a tablet weaving text, there are indications that they would be useful for woven narrow wares (several of the woodcuts show ladies at upright looms or portable rigid heddle looms).  The design itself is a little complicated for tablet weaving, but not overly so.

-While I originally wanted baby blue silk thread to use for the ground, I determined that adding white thread to the magpie's breasts would make the brocade pattern overly complicated (several passes already have 2 or even 3 colors, which ups the complication considerably), so I might end up using a white ground so the white bellies can come from the negative space rather than brocading.

-Guntram's Tabletweaving Thingy was incredibly useful in making this happen, though I'm still trying to figure out how to use the app to its full advantage.

-I think they look well enough like magpies (which was the main goal) but I might still tweak the blues and blacks a bit until it's perfect.

-the flowers are a different color of blue in the draft, but I might end up doing it in the same color blue as the wings and tails.  It depends on how masochistic I'm feeling.

-the plan for this is to make three garters -- a pair for me, and one for my husband to wear with his western stuff as a favor.

-I hope to string it up on my new mini structo loom (DI find of the year!) so I can carry it around events and things to work on.


*This book, which is amazing and awesome and is not in my possession right at this moment, so I can't list the specific reference.

Thursday, July 28, 2011

Moved In!

I've archived about a year's worth of relevant LJ posts by month (that's the only way LJ does it, which is annoying) and other than an omnipresent issues with pictures, it seems to have worked fairly well.  There are a few LJ things I will miss (easy time stamping, f-locking posts) but I'll manage.  The community aspect of LJ is also something I'll miss, but it's still there (when/if LJ functions) so I'll probably continue puttering around there a bit.

That's it, LJ...

I'm done with your Russian spam and 4-day near nonexistence. I'm moving back to blogger.

Tuesday, July 5, 2011

Lots of stuff, but very little sewing

Over the last two weeks I've pretty successfully avoided sewing the binding on the bottom edge of my corset but still did enough that I feel like I had an acceptable amount of accomplishment.


I ran the white silk through an hour-long dyebath using a little more than the recommended amount of dry dyestuff (Dharma Sapphire Blue Acid dye).  Unfortunately, it wasn't quite enough, and I didn't end up with the beautiful dark blue I fell in love with in Drew's samples.  However, I still find the color (a very clear sort of french blue) to be very striking and while I have enough dye that I could run it through again, I'm thinking that I might just leave it as-is.  The dark blue was a little iffy to document for the particular look of the 1560s, where gowns that aren't black seem to be pretty light colored.  I also found that iron-drying damp silk makes it *very* stiff, which is hopefully good news for all the couching I'm going to end up doing.

At FP last week Owen brought a bunch of costume jewelry pieces to sell on behalf of a local former scadian, and there were a few things I couldn't resist getting: 


The cross belt will work really nicely as is with my 15th century kirtle, and if I really wanted to, I could probably add spacers to it to make it a nice girdle belt.


And I found this awesome brooch!  The stone in the center (most likely glass) is a smokey blue color.


And in my neverending quest for cool time pieces, I found this great little watch face.  It'll make a great end for a girdle belt, but I'm still trying to figure out how to change the battery.  Hopefully I'll figure something out.


I'm working on some new SCA heraldry with a Magpie and three cinquefoils, so when I saw this piece I had. to. have. it.  It's a little more junky than the brooch and other pieces, but the design was inspired, so I went for it.


The seller also had a bunch of handmade bobbin lace, and I snatched about two and a half yards of this lovely stuff.  I'm thinking I might be able to work a simple cuff on my 1560s project.

Also, my zibillini came in from etsy!


It was originally a vintage 3-pelt mink stole, but I was able to pick apart the stitches without too much difficulty.  I love the silvery color they have going on.  I'm intending to give one to Aine to make a prize for the Insurrection A&S tournament, but that still gives me two to play with.  They aren't huge (maybe 16" long with the tails) so they should be pretty manageable on a belt chain.  PLUS, they were purchased before I heard about the ACC challenge, so they qualify as stash.

Of course, these were all *last* week's accomplishments.  The 4th of July weekend was spent visiting Drew's family in Rocklin, and while there was no sewing whatsoever, I had a lot of downtime and so avoided being completely useless:


Here is my first attempt at pearl knotting, using stash freshwater pearls.  Unfortunately, Hobby Lobby only sells silk beading cord in 2 meter cards, so the size of my piece is somewhat limited, especially since I made an unsuccessful buttonhole loop on one end (I ended up just tying the ends into 8-pearl loops).  I'm hoping to do knotted pearls for most of my jewelry for my project (in keeping with the Margot portrait), though I will need bigger ones for the necklace and belt (budget-wise, I might have to make do with what I have).  Some of the knots are kind of funky but I think the overall look will be nice with some practice.  I'm hoping this sample will work reasonably well for a hairpiece.
public0

Wednesday, June 22, 2011

LJ Archives: June 2011


June 22:  ACC: Fabrics
 My stash is pretty close to depleted, but I was able to pull all my fashion yardage from what I already have:


While this qualifies as stash, it's my newest purchase.  I got it at a Hancock sale on Saturday ($5/yard!).  It's a linen herringbone twill.  It's wonderfully soft and floaty and will go toward a smock and probably also a partlet.  There is also a japanese kosode in the works which will probably take the remainder of the bolt.


My corset is wearable so I can start fitting the dress but still needs several hours worth of work binding the bottom edges.  There is enough gold silk to make bias tape for those edges, and I'm hopeful that there will also be enough to put some guards on a petticoat.  The linen fabric on the right was originally yellow until I threw it into a blue dyebath, and now it's a great shade of foresty green, which will be really fun with the magenta corset fabric.


I had a picture of the blue on an earlier post, but here's a flash shot to give a little better idea of the color.  The original fabric is a sort of creamy white in a kind of funny mystery weave (not quite taffeta, but not really anything else), but it's 100% silk, takes dye like a champ, and has a really nice crisp finish with a decent lining.  There's enough to have some white silk to make the shoulder puffs, and maybe even to line a few things.  My white kirtle is the undyed version of this fabric, and it was actually quite easy to work with.


For the ropa/overgown I decided to finally use this rayon velvet that was probably my first big fabric splurge (I bought 10 yards right after I graduated college; it was only $4/yard).  It's a beautiful deep mulberry color that shines when it catches the light.  I also have 20 yards of gold metallic bobbin lace (half bright gold, half antique gold) to trim it.  While it might not coordinate perfectly with the dark blue gown, it'll look smashing with some other stuff I have (like my white kirtle).  I foresee this fabric being a nightmare to work with, and much hand-basting in my future.

There are still little bits that I might not be able to pull from stash (canvas, linings, etc) but I'm pretty hopeful that the cost will be minimal.

June 21:  Artemisian Costuming Challenge
So the call has been put out in our area for a challenge similar to the one started by Realm of Venus recently, except it's open to any time period or locale used in the SCA.  Since I had a brilliant idea for a gown anyway, I decided to join in.  The challenge includes making the following between now and the end of the year:

1.  A skin layer:  for this I'll make a square-necked linen smock/chemise, possibly with some embroidery around the neckline, and a green linen petticoat made to coordinate with my corset (hopefully).  I'll also finish my corset to wear along with it, though it might not count for the purposes of the competition. 

2.  The main garment:  This will be a blue silk gown based on the portrait of Margot de Valois with silver (yeah, I decided on the silver) couching.

3.  An outer layer.  I'm much more iffy on this (my whole point with the original gown was that I wouldn't need the extra layer) but if it's doable after everything else is done, I'm  thinking of a loose gown with a high neck, similar to this one worn by Margot's sister Claude:


It's very similar to portrayals of Italian zimarra, so I might take some cues from that angle.  I have no idea what it will be yet, because there's nothing in my stash that would work for it.  Hastings recommended a dark purple fabric lined in pink, which sounds fantastic with a heavy satin and linen, but we'll have to see.

4.  An accessory.  Any number of things can apply to this, but I'm thinking anything from the following:  a zibellino (probably with a lot of help from Holly), a partlet, stockings, tablet woven garters, a feather fan, etc.

There is also a price limit of $100, but stash materials can be used.  I can actually cover quite a bit from my stash, but I'll still need a lot of notions and shiny bits.

June 15th:  New Project 
I'd gotten some sapphire blue dye from Dharma in a futile attempt to get some silk embroidery thread that matched my blue 15th century kirtle (It tangled homelessly in the dyebath and I gave up on it when I found a thread that worked).  Drew pulled it out last week to do some shibori experiments, and it is the most brilliant color of blue imaginable.


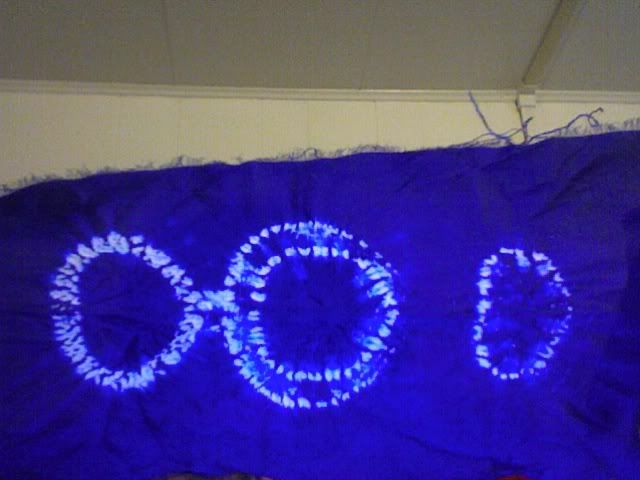
The photo barely does it justice.  I just stared at the sample scraps longingly before I turned my sights to the entire bolt still left over from both of our projects.  It turns out we still have over 8 yards, which demanded to be turned into a blue gown, so I called dibs.

I thought about doing a new Tudor, but the silk itself has a pretty soft drape, and even with the dye job giving it a crisper, more taffeta-like finish, I wasn't sure it would play well with the big sleeves of a typical tudor gown.  Besides, I already have one of those in the works.

So I went a little later, to the work of Francois Clouet in the 1560s, and I found this portrait of Margot de Valois as a small girl:


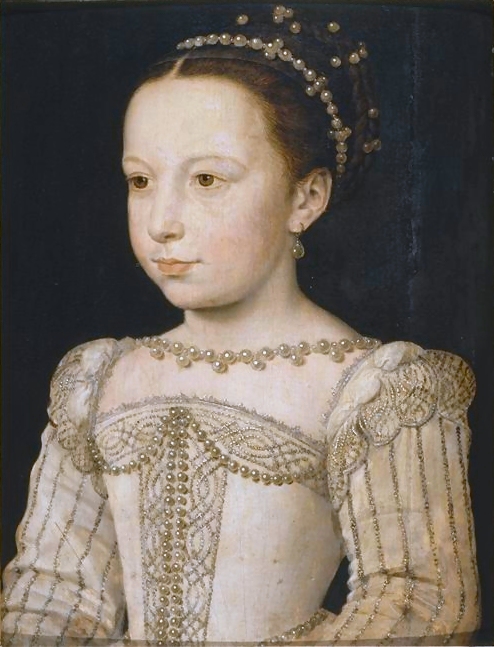
And there it was.  The dress that I must now have.   The work involved tailoring-wise is pretty simple compared to my other projects -- there's really only one visible outer layer, and I don't even need a petticoat if I don't feel like having a split skirt in the front (and I'm thinking I don't).  The sleeves are simple other than some classy embellishment and unique shoulder treatments, which are not huge and bulbous like what you see in England, nor are quite as crazy poufy and/or complicated like what you'd find in Italy.

Adult women wore this stuff too:


Claude de Châteaubrun de Beaune dame de Gouffier, by Francois Clouet, c. 1560s  (and yes, there are plans for a zibillino too, now that I can finally succumb to that particular fad)

My big internal conflict now is trying to decide if I want to do the embellishment in gold or silver.  Gold seems to be standard for just about everything in the period, and jewelry-wise it would look really great with the pearls.  Silver is used occasionally (it's certainly on Margot's gown), would be better suited toward my heraldic colors, and would  be really eye catching couched on the blue.  Using both at the same time seems cheesy.  Decisions, decisions.

June 8th:  I did a Thing!
Noelle asked if I could make her some garters for when she becomes a Laurel at Baron's war (big prestigious award in the SCA for historical arts), and gave me free reign over the design, so I decided to do not one but two techniques that were completely new to me:  brocading, and warp twine manipulation.  I'm playing a little fast and loose with specific time periods and places (though all of them are within the medieval period), mostly because I'm using design elements that are especially significant for the recipient.  It's woven with a Kanagawa 1000 denier silk that Noelle purchased and sent my way.

Here are my patterns:


The fleur-de-lis and leaf vine (reminiscent of laurel leaves, yes?) are from Ecclesiastical Pomp and Aristocratic Circumstance, about the 13th and 14th centuries maybe (I don't feel like checking right now).  The vine was originally for 13 cards and was sized up to work with a 25 card band, but the fleur (which is 17 cards wide) was alternated between sides to fill up the space.


The brocading worked fabulously, even with my wonky tension at the beginning.  This portion is for the tails of the garters, which are 5 fleurs long, or maybe 3-4 inches.  It's done with a Kreinik gold braid.

I was so tempted just to do the whole thing in this brocade pattern but it's really slow and the gold braid makes it a little stiff and potentially pokey.


The main body of the garters are the warp-twined laurel leaves.  I can't capture it very well because the effect is very subtle, but the design comes about by turning the relief backwards and the rest forwards.  This technique was in Peter Collingwood's Techniques of Tablet Weaving and is document-able to the 10th century.  It's also pretty slow, but I get a lot of satisfaction of splitting up the pack and turning them in different directions. 


I'm maybe six inches in, and have 36 or so more to go.