Friday, October 14, 2011

Tablet Weaving Angst

You may recall my original pattern for a brocaded pair of garters, using a weaving diagram from Il Burato:

I did a small repeat of the pattern in the silk months ago and haven't touched it since because the pattern, to my mind, wasn't working the way that I wanted it to.  Most of the lines were too narrow, the blue tails didn't read well, and the flowers were overly complicated and frail.  Brocading really seems to work best with strong diagonal lines of 2 threads or greater, which meant that the backs of the birds were reading very well (I loved how that part was turning out) but the rest was just kind of blah.

So, after looking at it in my apartment for months, I'm finally trying to come up with solutions.  The benefits of brocading are in its flexibility.  I can start over at any point with a completely new design if i so chose.  I started by strengthening some of the lines on the magpie and making the whole outline black instead of black and blue.

Then, I played around with the idea of taking out the 3-flower motif completely, as it had the thinnest lines and had more complication than I was really willing to put the effort into as a result.  The resulting bird-small flower-bird was too bottom heavy to use on its own, so I tried a bit of inverted tiling:


I thought I'd love this, but I merely like it.  It has nice strong diagonals, but I found I missed the larger flower motif.  So I tried to fill out the design a little more, while not making it quite as compact since that was making the weaving process with two colors difficult.  The results:


I think this might work.  There is a lot more white space (re: space I don't have to weave) which makes it a little simpler while still maintaining most of the integrity of the original design  Several of the lines are thicker to keep it from being so frail.  I won't really know until I start weaving it, but I'm hoping this will be a winner.

I'm also considering playing around with having a thicker line of brocading thread by waxing and doubling up the black and blue strands so they'd act a little more like a ribbon and better fill the space.  I'm searching for my motivation to do so, but it'll come.  Hopefully.

Wednesday, October 5, 2011

Petticoat Bits

Since I was working on a few updates anyway for the ACC, I'll go ahead and explain some of my documentation for the petticoat, as well as a few detail shots that I took today.

In my prowl looking for extant garments, I was elated when I found this beautiful painted cotton petticoat in my search of "1500-1600" in the V&A collections, but I'm convinced that 1570 as the starting year is incorrect or possibly even transposed (as in, it should read 1750).  The East India Company stamp indicates 17th century at the absolute earliest, and the design bears something of an 18th century aesthetic.  Nevertheless, Laura Mellin's instructions on making a 16th century petticoat produced a remarkably similar garment, so I'm willing to think that the basic nature of this item (hopefully) indicates some common lines of construction through time.  It's made in four panels and totals 4x my waist measurement along the width.

My cartridge pleating has no gathering stitches -- don't ask me why, but I was just too paranoid about lining them up well to even try that technique.  Instead, I marked a small hash mark every inch on the skirt and every 1/4 inch on the waistband, and used that as a guide as I whipstitched it together.

The seams and hem were all done by machine, with the gold silk guard covering up the line of stitching at the hem.  I was paranoid about having an overly wobbly line on the guard, so I pulled a thread in the fabric of the skirt for the top edge.  It was kind of a nightmare to follow, but it did end up nice and straight as a result.

Monday, October 3, 2011

ACC: Petticoat Bodies

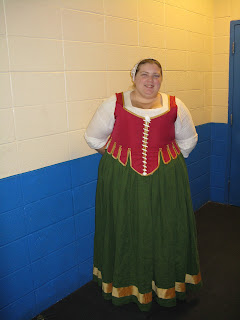
Just to show that I can in fact take a hint, I finally got motivated to wear my new petticoat bodies to fighter practice and take a few mug shots next to the gym.

Now for me to nitpick everything wrong with it:

The petticoat ended too big around the waist so it's sagging a bit, but it only needs a a few extra eyelets to pick up the slack.  Doing all of the eyelets to match the ones on the tabs is looking mighty tempting, just for the potential for cute little bows all around the waist.


 Also, because of the eleventh hour necessity to split it up the back, the bottom of the backmost tabs are taking way too much strain and so can't lace well.  It's kind of my own fault for having such a dramatic bit of shaping at the side back seam, but it doesn't effect the overall look too much.

Those issues aside, I am tickled to death with how it turned out.  It is exactly what I envisioned when I put the two fabrics together.  I wore it for the better part of the afternoon and there were not any screaming comfort issues.

Also, at two years after I'd finished my lovely embroidered coif, I finally have an excuse to wear it.

 As much as I love the attack laurel coif patterns, I have to admit that they are really big on me.  My hair's long but fine, so my only hope for tying it on was to do two braids over the top of my head to give the cord something to pull against.  It worked pretty well while the knot in the cord held, but it was too slippery (it's my silk tablet woven hairtie) to stay in long-term, and after a few attempts and the pictures I just stopped bothering with it.